Sunday, 30 June 2013

Speedy Nine-Patch

Little Flower has quite an affinity for Peter Rabbit and all the other charming Beatrix Potter tales. I love reading the stories to her – I remember reading them myself when I was young. The collection was kept tucked in a bottom shelf of the library, second aisle of books. I would go to that shadowy lower bookcase, plop down on the floor, and take out Peter Rabbit, Mrs. Tiggywinkle, the Flopsy Bunnies...I loved holding the little books in my small hands, I felt like Ms. Potter made them just for me!

So recently I purchased a Beatrix Potter fabric bundle and made a quick nine-patch cushion for Little Flower


Bunny decided she wanted to get in on the action, so she got out the owl fabric bundle I gave her for her birthday, with its bright turquoises and pinks. But my 10-year-old wanted to make the cushion with me. This nine-patch technique was taught to me by a quilting friend, it is so brilliantly simple quick – it cuts some time-consuming corners with sewing and pinning and whatnot – but I’ve never seen the technique in a book or a blog, so I thought I’d snap some pics and show you here!

First you cut your squares. I’m not going to give measurements, because this works on cushions, quilts, anything with a nine-patch square...


Bunny wanted to fussy cut the owls

Then lay out the nine squares in the pattern you wish

Now here’s the first sewing step, so pay attention. Fold the right-side squares face down over the centre squares, so the right sides are together.

Take the top two squares, just stacked as they are, and sew a ¼-inch seam down the right side, nearly to the end. Unless the squares are very big, don’t worry about pinning them, just line them up neatly and be careful not to slide them around.

Just before you get to the end of this first edge, take the centre two squares and line them up with the previous two. But don’t overlap! You don’t want to sew them together as such, you just want to continue sewing the edge – you basically are saving the step of cutting the thread of the first two squares, setting them to the side, then sewing the edge of the next two squares, cutting the thread, setting them to the side...

Can you see how they’re just touching at the edges but not being sewn together overlapping? Continue down the edge, then grab the bottom two squares and line them up the same way. This time sew clear to the end, and cut the thread. Open up the squares and you will have this

Your centre column of squares is now patched to the right column. Repeat the process on the left side

You will need to either sew from the bottom two squares up or turn the squares over to sew the seam from the top down, so that the fabric columns are kept to the left of the presser foot. This will be clearer to understand when you are actually doing it! Just be careful and make sure everything is lined up the right way. Here’s the next column finished

Pretty speedy, eh? Now let’s finish this nine-patch – fold the bottom three squares towards the centre

(I will state here that I don’t bother pinning or pressing edges or seams during any of this, because my quilting guru said it wasn’t worth the extra effort, but if it helps you sleep better at night, be my guest.)

Sew a seam along the edge of all three squares. Take care to line up the previous seams as best you can to keep the patches aligned on the finished piece.


Repeat this process with the top row.

Here is Bunny’s completed nine-patch! Isn’t it jolly? She noticed the uneven squares on the bottom two rows and wasn’t happy, so we sewed on some owl ribbon.

This is why I emphasized the precaution of lining up seams carefully in the last step – but I’m pointing out her little error here so you see how to fix it without ripping it out. I barely noticed it myself, I was just tickled that she was enjoying using the sewing machine!

Simple envelope style for the back – two pieces with topstitched seams...

...overlapped onto the front panel, right sides together...
The front panel is under there...
...and sewn all round. Ta-dah!!!

Well done, Bunny! Incidentally, this is the technique I used for the patches of my Happy Spring Quilt – that was a Disappearing Nine-Patch, because after the nine squares were sewn together, I took the rotary cutter through the centre of each block, dividing it into four patchwork squares. And no, I still haven’t finished my first quilt, but hey, I’ve managed to steal enough time to put the border on the front this weekend...

Happy crafting!

Chrissie x

Friday, 28 June 2013

Off the hook: Ice Cream Scarf

A quick post to show you my quick WIP completed!

The colours of Neopolitan ice cream...
I first wrote about this scarf in my book review of Crochet One-Skein Wonders. This was a lovely little project, very simple stitch pattern and very fast to crochet. And it used only one ball of yarn.
That being said, if I make this as a gift for someone, I will buy two balls of yarn. This is a short scarf, it crosses over in the front to tuck into coat lapels but is not long enough to wrap right around the neck (I have a sneaking suspicion that one of my girls will be sporting this with a winter coat next December...). Perhaps it was the yarn I used; a finer strand might come out longer. But I loved this yarn, so if I buy similar I will buy double.

One more modification depending on the wearer: a wider scarf. This pattern chained 26, which is perfect for me, but someone taller might prefer a wider scarf. I would play around with a 40 chain for a few rows to see how it looks.
But all in all, a successful project that I plan to do again, making minor adjustments as necessary. And I would recommend it to others – it would be a great project for learners, too. I’m actually considering using the stitch for a table runner or placemats, with a solid-colour cotton or string or something interesting...watch this space!

Have a happy, crafty weekend!
Chrissie x

Tuesday, 25 June 2013

Grandma-Loves-Me Peach Cobbler

The sun is shining, peaches are in season, so it’s time for peach cobbler! Have you ever tasted this dish? Imagine the indulgent comfort of a winter dessert combined with the sunshine juiciness of fresh summer peaches, and you have the amazing peach cobbler.

You really must make this. Please! I am almost insisting! It will make your tummies *so happy*. It’s the kind of dessert with which you leave a spoon in the casserole dish so you can sneak another bite when you walk past the kitchen.
I can’t remember when my Grandma first made it for the family, all I know is that whenever she did, I felt very loved! So I’ve named it Grandma-Loves-Me Peach Cobbler, but you may adapt it to suit your family...  

The recipe written in my book doesn’t have instructions as such, I just scribbled a note here and there as Grandma baked and shared the recipe. I love terms such as “4-6 fist-sized peaches” – the ladies in my family are all quite petite, so who knows how many cups or grams of sliced peaches is really required? Never mind, you “eyeball it” and add another or take some away to fit the dish.
I spent some time converting the measurements to suit both American and British kitchens. Conversion charts can’t be trusted here – a quarter cup of flour weighs decidedly less than a quarter cup of packed brown sugar. So I measured with American measuring cups, then weighed on the scales or poured into an old baby bottle that gives me accurate metric liquid measurements. Everyone should have teaspoons and tablespoons, so I didn’t worry about that.

Oh, I will note that, when I have them, a handful of berries makes a lovely addition. But my girls ate them before they made it into the pan...
Here’s what you need:

 9in/22cm casserole dish
4-6 fist-sized peaches, just ripe (too ripe and they’ll create too much juice and go mushy)

½ c/100g caster sugar (now, I use a bit under this amount to cut down on the sugar, but this is what the original recipe called for)


1 Tablespoon cornstarch/cornflour mixed with ½ c/120ml cold water
¼ c/60g light brown sugar
1 Tablespoon butter
1 Tablespoon lemon juice


1 c/180g plain flour

½ c/100g caster sugar
1½ teaspoons baking powder
½ teaspoon salt

¼ c/60g cold butter, cut into pieces

½ c/120ml milk

Extra sugar for sprinkling on top

And here’s what you do:
Preheat the oven to 350◦ F/180◦ C.

Cut a cross lightly through the bottom skin of each peach, then drop into a pan of boiling water for about half a minute.


Remove with a slotted spoon, then peel – the skins should slide off easily. Slice into bite-sized chunks. Put in a medium saucepan, add the ½ c/100g sugar (or 2/3 of that amount), and bring to a simmer. When they release their juices, stir in the cornstarch/cornflour and water mixture. Simmer, stirring a bit, until the juices thicken. Add the brown sugar, butter and lemon juice and cook for another minute or so (add the berries at this point if using). Remove from heat and pour gently into the casserole dish.

In a medium bowl, mix the flour, sugar, baking powder and salt. Cut in the butter with a pastry cutter or some knives until the mixture has a crumb texture.

Pour in the milk and stir until combined and the mixture forms a thick dough.


Drop gently by the tablespoonful on top of the peaches.

Sprinkle with sugar, pop in the oven, and bake for 35-40 minutes, until the top is golden and looks like a cobbled street (ah, now you know how it got its name!). Leave to cool as long as you can – it can be eaten warm, but personally it is best when just a bit warm or room temperature. But I strongly advise you sample along the way and decide for yourself!
I also advise you tidy up all the ingredients before the little dairy-loving gremlin disguised as your three-year-old child finds the butter...

Yes, those are teeth marks.
British folks might like to have cream to pour over the top of their servings; again, test it out and let me know!

 
Yum. My girls have had two helpings each, not sure if this cobbler will see the light of the next day. And Bunny *just this very moment* came to ask me for another serving! Mama-Loves-You Peach Cobbler!
Do let me know if you try this recipe, happy baking!

Chrissie x

Sunday, 23 June 2013

Prettifying the bookshelves

Thank you all for your kind words and commiserations regarding my lack of sleep the other day – Little Flower has since slept much better and, consequently, so have I! And I have something to show for those extra hours of sleep...

Doesn’t the bookcase look *pretty*?!? I am so pleased with how this project has turned out – especially since I’ve never decopauged a piece of furniture before, and because it’s my first time using vintage wallpaper, and I was worried I’d ruin the beautiful patterns!

I was a bit worried about this side bit, the patchwork looked so dramatically different from the plain wood, quite mad really, especially when you compare it to the neutral space of my living room and hall. But hey, this is *my* space, this is where I cook and craft and create, so I am allowed some girlie expression, right?  And I think it all started to come together once I started lightening up that wood with some white paint I found in the garage.

 Most of the time all I’ll see is the front of the shelves, as the door is usually open and blocking the patchwork side.
 
I think the shelves just look so cheery with the pretty wallpaper (thank you Ada!).  

I still have some bits to trim, a touch-up of paint here and there, and a few books are missing, but I was too anxious to show you my ta-dah!  
News on the woodpecker family: young Woody visits regularly morning and evening, eating voraciously; Mama Woodpecker has made a few appearances when Woody takes a break; and today Daddy Woodpecker swooped in for some tea – haven’t seen him in a while! You can just barely see the red feathers on the back of his head

 
He wasn’t being cooperative and turning his back to me so I could photograph the red patch properly – you’d think he’d be a little more grateful for all the bird food fat balls I’m having to purchase! I’d like a family portrait, please!

Chrissie x


Friday, 21 June 2013

Craft hangover

No unveilings today of recent WIPs, as intended, because nothing got finished. Not for my lack of trying, mind – I managed some progress on everything, from a few scarf rows crocheted, nearly all of the Dr. Seuss Sam character outlined in black floss, another fun crochet teaching session Wednesday morning...but not one thing completed. Not even a photo of my small accomplishments.

Today I had planned to put the finishing touches on at least one project, so I could show you here and start the weekend with the satisfaction of a WIP done. Last night I had my quilting friends round to help me design the back of my quilt (“design” being a clever way of saying I hadn’t bought enough of the backing fabric, so could we figure out a way to piece together scraps without spending another penny) and get me started on the border and quilt sandwich. The four of us had a jolly evening catching up, discussing crafts...and I enjoyed making a fruity Pimms cocktail, complete with fruit, cucumber, and a sprig of fresh mint from my garden.
I only had *one* refreshing glass, so why the “Craft hangover” title of this blog? Why indeed. I had such a productive day with all of my WIPs, even my very first quilt. I felt so enriched and happy after the gals left, I decided I’d stay up a bit later and make Bunny’s lunch for today, tidy up the kitchen a bit, catch up on a few blogs...so lights out just past midnight, past my normal bedtime.

Then Little Flower decided 4:20a.m. is a fine time to start the day. Ugh.
She is a terrific sleeper, normally. Never a fuss at 7p.m. bedtime, sleeps until around 6:30 each morning. Maybe I stayed up too late, maybe I had too much fun last night, because the Powers-That-Be are punishing me today! I feel like I drank a pitcher of Pimms and partied all night. I’m rubbish without a good sleep. I wish I could function on a few hours’ shuteye, but I’ve been in a fog all day.

You know the feeling? Earlier I walked upstairs, then stood in the hall for a good 30 seconds wondering what on earth I came up to get, then shrugged and went back down. Never mind. I made a feeble attempt to make progress on a WIP, but stitched the scarf stitch sequence into the blanket I’m working on (put down the hook, Chrissie, and slowly back away from the crochet...).
Mama Woodpecker has it figured out. She stayed in bed when young Woody woke early.


See him there, having breakfast all on his own? Part of me feels like she’s being a bad parent, sending him out into the world all by himself when he is so very young. But another part of me feels she’s one smart cookie, and I’m jealous that her little one can manage on his own while she gets some more sleep. And a big part of me is worried because I am pondering the parenting skills of a bird.

Darling Husband has been away on business all week, back tomorrow, so I’ve put Little Flower to bed (as usual, quite happily, though she’d better not try an early morning again tomorrow!) and Bunny and I are having a sleepover. Cuddly pajamas, hot chocolate, magazines and lights out early. That will make up for the muddled delirium I felt at 5a.m.!
Tomorrow is a new day...Chrissie x

P.S. Welcome to my new followers, thank you so much for visiting, and I promise to have more creative posts this weekend! :-)

Tuesday, 18 June 2013

Growing...

Lots of growing around here. Flowers growing...


Babies growing...

The woodpeckers finally introduced their baby!
 
Can you see Mama Blue Tit feeding her two babies in this grainy photo?

Scarf growing...

I crocheted rows and rows last night whilst sipping Pimms and catching up with a friend!

Sam growing...


Vintage wallpaper project growing...

Ta-dah moment nearly here, just a bit of trimming and painting left to do!

...and secret crochet gift growing - shhh!

Another ball of yarn unwrapped!


What's growing with you this week?

Chrissie x

Sunday, 16 June 2013

A touch of handmade in a neutral space

It is always good fun to have a sneaky peek at someone else’s home, so come snoop around my sitting room today. It is much more subdued than some of the *other rooms* in the house, but I have still managed to get some homemade goodness here and there, with more to come as I finish my WIPs...

This room is a very neutral space, to keep everyone in the family happy. We all agree on hardwood floors, a woodburning stove and subtle shades of taupe (I know, deep down, that taupe is to the new millennium what avocado was to the 1970s. I know one day, sadly, it will look completely dated). We renovated this room when I was pregnant with Little Flower four years ago – the original room had one of those fake gas fireplaces with the mantle stuck to the flat wall. We had a chimney breast built and installed the woodburner, which is probably the best improvement we’ve ever made. I love my woodburner!
After the cost of installing the fireplace and floor, I couldn’t get custom-fitted bespoke bookshelves, but Ikea’s Stockholm range had the next best thing, which miraculously fit perfectly in the space. The TV unit is from the same range.

This console table is from the same Ikea range, too, but at this point the room was getting a bit too ‘woody’ with the hardwood floor and all, so I matched a paint colour to the sofa and painted it. Little Flower came along before I was able to put a protective varnish on top, so it’s become a bit unintentionally distressed.
The coffee table, however, is very intentionally distressed...

If the woodburner was the best improvement, distressing a central table such as this one is the smartest. This children can bump it, play games on it, spill a drink on it...it all adds to the Shabby Chic charm (and my goodness I’m glad this design trend is still around, I hope it doesn’t go completely out of style until Little Flower is 15 or more...).
I have revamped lots of furniture over the years, painting, stippling, mottling, liming, antiquing, distressing, etc. This table was bought when I was first married, a flat-packed inexpensive one, and I wasn’t going to invest in something else with small children in the house. It was originally wood tone, so I needed to update it to suit the new decor.

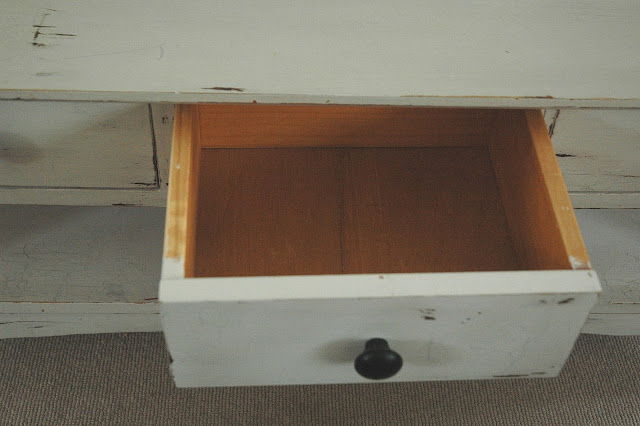
See the inside of the drawer? That’s the original colour. I sanded it, painted a coat of primer, then two coats of a greyish-white. Painted the drawer knobs black. I sanded here and there, whacked it with a screwdriver or somesuch, and then I experimented a bit with crackle glaze.

I don’t care for the look of an entirely crackle-glazed piece of furniture, but a bit of crackling here and there looks like the piece was left in the sun, or that something spilled and left a bit of damage – good grief, isn’t this design trend going to seem *so completely bonkers* a few decades from now? I mean, really, intentionally damaging furniture? At least I’m doing it myself and not spending a fortune on it in some posh shop...
Good sewing, on the other hand, will always be appreciated. My grandmother made all the cushions for me because I couldn’t sew at the time. I especially love the giant floor cushion by the children’s shelf, so they can sit and read or play a little game.


All of the fabric is from Vanessa Arbuthnot, in soft greens and blues. I love the fern pattern of the sofa cushions.

 
I plan on adding to these with some of my own homemade creations and make my grandma proud!
But where are all the toys and kids’ junk? Tucked in the opposite corner

My great-grandfather made the little kitchen cupboard for my grandma in the 1930. It has now been played with by four generations of little girls! I love watching my girls play with it; I remember opening the cupboards and putting in my own tea set, I remember the smell and feel of the wood. Childhood memories. I don’t think he intended it to become an heirloom when he made it from scraps of wood, but it is now priceless.
The best thing about putting the play area in this corner is that, after a long day, I can turn my back on the mess, because the sofa faces the other way. Out of sight, out of mind! That actually might have been a better decision than the woodburner...

Chrissie x