Showing posts with label home decorating. Show all posts

Tuesday, 4 February 2014

Pretty, permanent blossoms


After posting about the discovery of snowdrops in my last post, I wanted to share with you the snowdrop I have year round...


This is a tiny framed tile, perhaps two inches square, created with a real snowdrop and glazed in earthy green and teal blue hues.


It hangs in my kitchen as part of a set of small herbaceous-themed tiles, which I purchased from Emma West Ceramics years ago. They make me happy. 

I had read about Emma West in an issue of Country Living magazine, then promptly ordered a few treasures for myself. We had recently moved into our house, and we had no budget for bathroom renovations or large tiles, so I ordered these simply framed little gems instead.

Fast forward a few years, and we were redecorating the downstairs loo. When deciding on tiles for behind the sink, I immediately knew what I wanted:


I chose a range of flora and fauna (she only had what was ‘in season’!), and a more bluish glaze than the greener kitchen version. I am enchanted by these tiles, and I wish I could have them dotted around the house, not just allocated to the loo!


I love that these tiles give me almost fossil-like souvenirs of the garden, whatever the season, whatever the weather.

Just a bit of pretty for your day!
Chrissie x


PS Thank you all so much for your wonderful comments on my recent posts. For those of you who liked the photos of my living room (and perhaps want to snoop around my house a bit more!), check out my early posts about decorating here, here and here

Friday, 16 August 2013

Book review: Granny Squares

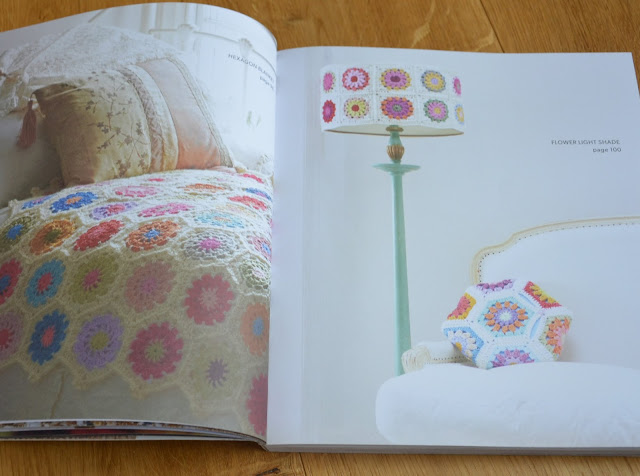
I bought this book a little while ago, simply because it looked so happy and colourful! Let me tell you about it...


Granny Squares by Susan Pinner includes 20 granny square projects, and unlike many books which feature a collection on a theme, I could actually see myself making every project! No duds!


I have an old stool which is screaming for a cover like this


And this beauty of a cushion would be great in Little Flower’s room...though I’m not sure I’d allow the pretty picnic blanket to be tossed on the ground!


And one day, when I have my own craft room (a gal can dream!), I will have a lampshade like this


While most of the projects feature very colourful yarns, there are a few pictured in one colour, a simple ivory, which shows off the beauty of the texture. I like all the rainbow brights, but part of me would love to do one of these projects in neutral shades...and these projects would be perfect opportunities to try out some of the colour schemes from my Colour Palettes Pinterest board.

Granny Squares is full of gorgeous photos that definitely add the chic to granny chic! The book is printed on the beautiful, matte, quality paper that I love. Dotted throughout are super ‘Granny’s Tips’, which offer sage bits of advice that are useful for beginner and advanced crocheters alike.

Anyway, I don’t like reviewing a book without actually having tried at least one project, so here’s what I’ve started


This bold, bright bathmat is perfect for the girls’ bathroom – their current one, which I crocheted a while ago, is getting quite worn. If I make this one then we can alternate between the two mats.

Now to the nitty gritty: How is the pattern? Well, for the most part, it was easy to follow and made a fun little hexie


But I was wishing for a little more explanation with certain elements. It assumes knowledge of cluster stitches, or you have to refer back to the beginning of the book for a full explanation. Sometimes I prefer everything to be laid out in one pattern, to save flipping back and forth (I know how to do clusters, I’m speaking here for beginner crocheters or for anyone working on a new technique). How do you feel about this? Do you like the pattern in detail, or do you prefer to get on with it and have a reference page if you need more explanation? I’m curious...

Also, the yarn requirements call for equal amounts of merino DK and acrylic DK, and the hexagons are worked with one strand of each yarn together – but no explanation as to why. Does the acrylic help the merino wear better underfoot? I’m not sure. And heaven knows I don’t have the same colours in both merino and acrylic, so I know I won’t be working it up this way.

In fact, I tested this with some of the yarn I used on the original bathmat, which was a very silly garden meadow mat that was perfect for a child’s bathroom


The girls love this mat, and the bright flowers match the colours I painted on the cupboards and walls. So I might use the leftovers to do some hexies and buy more of the same yarn. It is a chunky acrylic, so I don’t have to bother hooking two strands of DK together.


I need to rummage through the craft cupboard to see if I can dig up the original wrappers for this yarn, because I can’t remember what it is! And here’s where I heed a useful tip found on page 33 of Granny Squares: “I keep extensive notes and file all my ball bands with a small sample of the yarn. It might seem a bit of a hassle to do this but in the long run you will find it extremely useful.”

Indeed. There’s my New Year’s Resolution!

Chrissie x

Saturday, 10 August 2013

And so to bed...

One of life’s little joys is the first night sleeping in your own bed after a holiday. The familiar comfort of your very own mattress and your very own pillow. There’s nothing like your own bedroom, your private retreat at the end of the day, is there?

Well, at least I know there’s probably not many like my bedroom...
You’ll either love it or hate it, but this is my wacky bedroom wall mural. I painted this “feature wall” three years ago, when Little Flower was a few months old. Perhaps it was post-pregnancy hormones affecting my creativity, causing me to go a tad overboard with the crafty endeavours (I wasn’t yet embroidering or sewing, I only knew how to crochet back then).
But there is a story here that I want to share with you.

The master bedroom, when we moved in nearly 10 years ago, was a less-than-serene shade of dark yellow. The carpet was a thin, worn royal blue. Ugh. It remained this way for years, as we had other priorities in the house – the kitchen, the sitting room, Bunny’s bedroom...everything else took precedence over our room, which is silly, because this is where we are supposed to find solace, to relax and recharge our batteries.
Well, one day I was reading either House & Garden or Homes & Gardens, you know, one of those rather upscale decorating mags. I would buy them for inspiration around the house, then knock together something similar for a quarter of the price of the items on those posh pages. Flicking through the issue, I came across an amazing home featuring grand murals. The bedroom was a peaceful sage green, soft but not pastel, calming, a quiet, natural shade. The weeping willow-style branches, with their dainty aqua buds dotted here and there, were dramatic but yet graceful. I was entranced. I had to have this on my wall!

So I read the details closer, to find where I can get my hands on this wallpaper. I’ll splurge, I thought, and just buy enough to cover one wall, knowing it wouldn’t be cheap.

But this wallpaper wasn’t any old posh wallpaper. It was hand-embroidered silk wallpaper from China. And it as £284 per square meter.

Yup, that’s right. About £5,000 to cover that wall, I reckoned, after I got out the tape measure and did a few measurements.
The paint pots have been replaced with a much more tasteful brown linen cube stool...

So I taped the mag photo to the wall, grabbed a pencil and jumped on the bed, and I started drawing on the walls (these were the days before wall stickers were easy to find everywhere!). I figured I’d better do this now before Little Flower was old enough to see me and think it’s okay to doodle on walls anywhere in the house.
I sketched a few branches, then I bought one small tester pot of dark brown paint. What could go wrong? If we don’t like it, paint over it.
After matching the green and painting the walls, I drew the entire mural on the wall. I was nervous painting the first little branch in the corner, of course, but I kept going and loved it.

 
The nice thing with branches is you can be as wobbly as you like with painting, it doesn’t matter, because trees are knotty and bumpy and not at all straight.
I got out the old acrylics I used for the fairies in Bunny’s room and mixed some turquoise and some white to make the buds, just like in the magazine. I never, ever would have put turquoise, sage green and dark brown in a colour scheme, but oddly, I think it works!

 
I even went so far as to copy the wall lamps on either side of the bed with the duck-egg shades, and the large kingfisher-coloured cushion with the smaller duck-egg cushions on the bed. But of course for a fraction of the cost of the ones in the magazine (and now I would have bought fabric and sewn them myself!). Last year I found the brown and teal bedding in a catalogue, so now we have “summer bedding” and “winter bedding” – how very grown up, eh?
Of course, now that I’m into embroidery, I’m wondering how one learns to stitch wallpaper...

Chrissie x


Sunday, 23 June 2013

Prettifying the bookshelves

Thank you all for your kind words and commiserations regarding my lack of sleep the other day – Little Flower has since slept much better and, consequently, so have I! And I have something to show for those extra hours of sleep...

Doesn’t the bookcase look *pretty*?!? I am so pleased with how this project has turned out – especially since I’ve never decopauged a piece of furniture before, and because it’s my first time using vintage wallpaper, and I was worried I’d ruin the beautiful patterns!

I was a bit worried about this side bit, the patchwork looked so dramatically different from the plain wood, quite mad really, especially when you compare it to the neutral space of my living room and hall. But hey, this is *my* space, this is where I cook and craft and create, so I am allowed some girlie expression, right?  And I think it all started to come together once I started lightening up that wood with some white paint I found in the garage.

 Most of the time all I’ll see is the front of the shelves, as the door is usually open and blocking the patchwork side.
 
I think the shelves just look so cheery with the pretty wallpaper (thank you Ada!).  

I still have some bits to trim, a touch-up of paint here and there, and a few books are missing, but I was too anxious to show you my ta-dah!  
News on the woodpecker family: young Woody visits regularly morning and evening, eating voraciously; Mama Woodpecker has made a few appearances when Woody takes a break; and today Daddy Woodpecker swooped in for some tea – haven’t seen him in a while! You can just barely see the red feathers on the back of his head

 
He wasn’t being cooperative and turning his back to me so I could photograph the red patch properly – you’d think he’d be a little more grateful for all the bird food fat balls I’m having to purchase! I’d like a family portrait, please!

Chrissie x


Tuesday, 18 June 2013

Growing...

Lots of growing around here. Flowers growing...


Babies growing...

The woodpeckers finally introduced their baby!
 
Can you see Mama Blue Tit feeding her two babies in this grainy photo?

Scarf growing...

I crocheted rows and rows last night whilst sipping Pimms and catching up with a friend!

Sam growing...


Vintage wallpaper project growing...

Ta-dah moment nearly here, just a bit of trimming and painting left to do!

...and secret crochet gift growing - shhh!

Another ball of yarn unwrapped!


What's growing with you this week?

Chrissie x

Sunday, 16 June 2013

A touch of handmade in a neutral space

It is always good fun to have a sneaky peek at someone else’s home, so come snoop around my sitting room today. It is much more subdued than some of the *other rooms* in the house, but I have still managed to get some homemade goodness here and there, with more to come as I finish my WIPs...

This room is a very neutral space, to keep everyone in the family happy. We all agree on hardwood floors, a woodburning stove and subtle shades of taupe (I know, deep down, that taupe is to the new millennium what avocado was to the 1970s. I know one day, sadly, it will look completely dated). We renovated this room when I was pregnant with Little Flower four years ago – the original room had one of those fake gas fireplaces with the mantle stuck to the flat wall. We had a chimney breast built and installed the woodburner, which is probably the best improvement we’ve ever made. I love my woodburner!
After the cost of installing the fireplace and floor, I couldn’t get custom-fitted bespoke bookshelves, but Ikea’s Stockholm range had the next best thing, which miraculously fit perfectly in the space. The TV unit is from the same range.

This console table is from the same Ikea range, too, but at this point the room was getting a bit too ‘woody’ with the hardwood floor and all, so I matched a paint colour to the sofa and painted it. Little Flower came along before I was able to put a protective varnish on top, so it’s become a bit unintentionally distressed.
The coffee table, however, is very intentionally distressed...

If the woodburner was the best improvement, distressing a central table such as this one is the smartest. This children can bump it, play games on it, spill a drink on it...it all adds to the Shabby Chic charm (and my goodness I’m glad this design trend is still around, I hope it doesn’t go completely out of style until Little Flower is 15 or more...).
I have revamped lots of furniture over the years, painting, stippling, mottling, liming, antiquing, distressing, etc. This table was bought when I was first married, a flat-packed inexpensive one, and I wasn’t going to invest in something else with small children in the house. It was originally wood tone, so I needed to update it to suit the new decor.

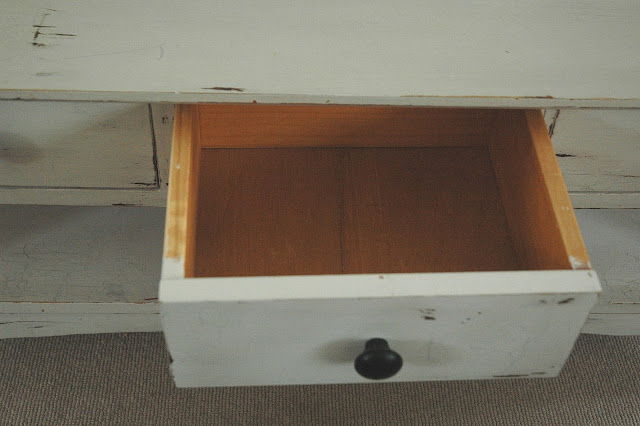
See the inside of the drawer? That’s the original colour. I sanded it, painted a coat of primer, then two coats of a greyish-white. Painted the drawer knobs black. I sanded here and there, whacked it with a screwdriver or somesuch, and then I experimented a bit with crackle glaze.

I don’t care for the look of an entirely crackle-glazed piece of furniture, but a bit of crackling here and there looks like the piece was left in the sun, or that something spilled and left a bit of damage – good grief, isn’t this design trend going to seem *so completely bonkers* a few decades from now? I mean, really, intentionally damaging furniture? At least I’m doing it myself and not spending a fortune on it in some posh shop...
Good sewing, on the other hand, will always be appreciated. My grandmother made all the cushions for me because I couldn’t sew at the time. I especially love the giant floor cushion by the children’s shelf, so they can sit and read or play a little game.


All of the fabric is from Vanessa Arbuthnot, in soft greens and blues. I love the fern pattern of the sofa cushions.

 
I plan on adding to these with some of my own homemade creations and make my grandma proud!
But where are all the toys and kids’ junk? Tucked in the opposite corner

My great-grandfather made the little kitchen cupboard for my grandma in the 1930. It has now been played with by four generations of little girls! I love watching my girls play with it; I remember opening the cupboards and putting in my own tea set, I remember the smell and feel of the wood. Childhood memories. I don’t think he intended it to become an heirloom when he made it from scraps of wood, but it is now priceless.
The best thing about putting the play area in this corner is that, after a long day, I can turn my back on the mess, because the sofa faces the other way. Out of sight, out of mind! That actually might have been a better decision than the woodburner...

Chrissie x

Thursday, 6 June 2013

A perfect pick-me-up

I fell into a bit of a slump earlier this week. I was on a roller-coaster high during half term, having my mother here, adventures with the girls, sunnier weather, lots of time to be crafty and creative...topped off with the completion of my first quilt top.

But roller coasters come zooming down those high points, and after everyone went back to their routines, I was faced with an empty house, full of mess, piles of stuff to do, but sunshine outside taunting me as I went about clearing up after the party that was our half term.
Grandma and her fan club

I had nothing much to blog about, because at the moment I’m working on not one, but two, secret gifts that I can’t show you until they are given. I have felt very blah for a few days, but this morning I had enough. I dropped off the kiddies at school then went straight to the gym (which is a miracle, as I am not a gym person, but I’m making a bit more effort so I don’t go up a dress size. It’s exercise more or bake less. What would you do?). An hour later I was feeling uplifted (the endorphin rush hadn’t yet kicked in, I was uplifted because I actually made it there and did something!).  I came home to find a parcel outside my door, opened it to find...

...feeling a bit giddy...


...and now elated! Ah, how a bit of jolly print can raise one’s spirit! Perhaps it’s the combination of beautiful patterns and the anticipation of what to do with it? I love a creative challenge to boost my mood and give me new focus...


Doesn't Little Flower's fancy heels go well with the wallpaper? It's holding the paper in place.
The photos don't do justice to the liveliness of the colour and design. This is my very first purchase of vintage wallpaper, from the doyenne of vintage patterns, the lovely Ada from Vintage Sheet Addict. You would think it was Christmas morning in my house as I unrolled sheet after lovely sheet of this gorgeous stuff, I was literally squealing with excitement! Why on earth did anyone stop using these happy wallpapers?


I must confess to you that at first I wasn’t sure what all the fuss was about. I mean, really, such rhapsodic reactions to some old wallpaper or sheets? Well, I am eating my hat now because I am totally addicted. Stunning.


I bought these from Ada’s Etsy shop, after seeing her blog about fun uses for vintage wallpaper. I had in mind decoupaging some wooden hearts I bought at a craft fair ages ago. I might still do that, but the first thing I did after I stopped ooo-ing and ahhh-ing was to hold the patterns up to this


I’m thinking my cookbooks would look much more appealing on some brighter, prettier shelves...
(Ada, I might be ordering some more wallpaper soon!)

Happy crafting all, here’s to being happy!
Chrissie x