


(Here I must beg
forgiveness for the poor photo quality. It was a beautiful sunny spring day
outside, so of course I decided to photograph indoors, because I’m clever like
that. And of course I didn’t check the images as I went along because Dear
Husband was working on the computer upstairs. “It will all be fine” will never
be a thought in my head again.)
First you need a ball of twine, and a word of warning: This
is not your usual crochet. Twine is stiff, and you have to work at this a bit
to maintain tension and get the hook through. If you find the stitches too
tight for the hook, go up a hook size and sip a glass of wine to relax your
tension a bit. I’m a very tense crocheter, so I speak from experience! ;-).
You will get the flow of this once you’ve got past the
initial first tiny rounds. Stick with it! It is totally worth the extra wee bit
of effort – the effect is so lovely, but you also could try plain string with
similar interesting texture.
So, with your twine and 5mm hook, chain 2.
Round 1: Work 6dc into first ch, join into a round with sl
stRound 2: 2dc into each st around, join round with sl st (12st)
Round 3: *1dc, 2dc in next st; repeat from * around (18st)
Round 4: *2dc, 2dc in next st; repeat from * around (24st)
Round 5: *3dc, 2dc in next st; repeat from * around (30st)
Round 6: *4dc, 2dc in next st; repeat from * around (36st)
Now here is where I stopped working the base of the basket
and moved to make the sides. But this pattern is very flexible – if you want a
bigger basket, continue rounds in the same sequence as listed above, adding an
extra dc in each round, until you are satisfied with the width of the base.
Then:
Round 7: Work 1dc in back
loop only (BLO) of each st
Round 8 – end: 1dc in each st until desired height is
reached

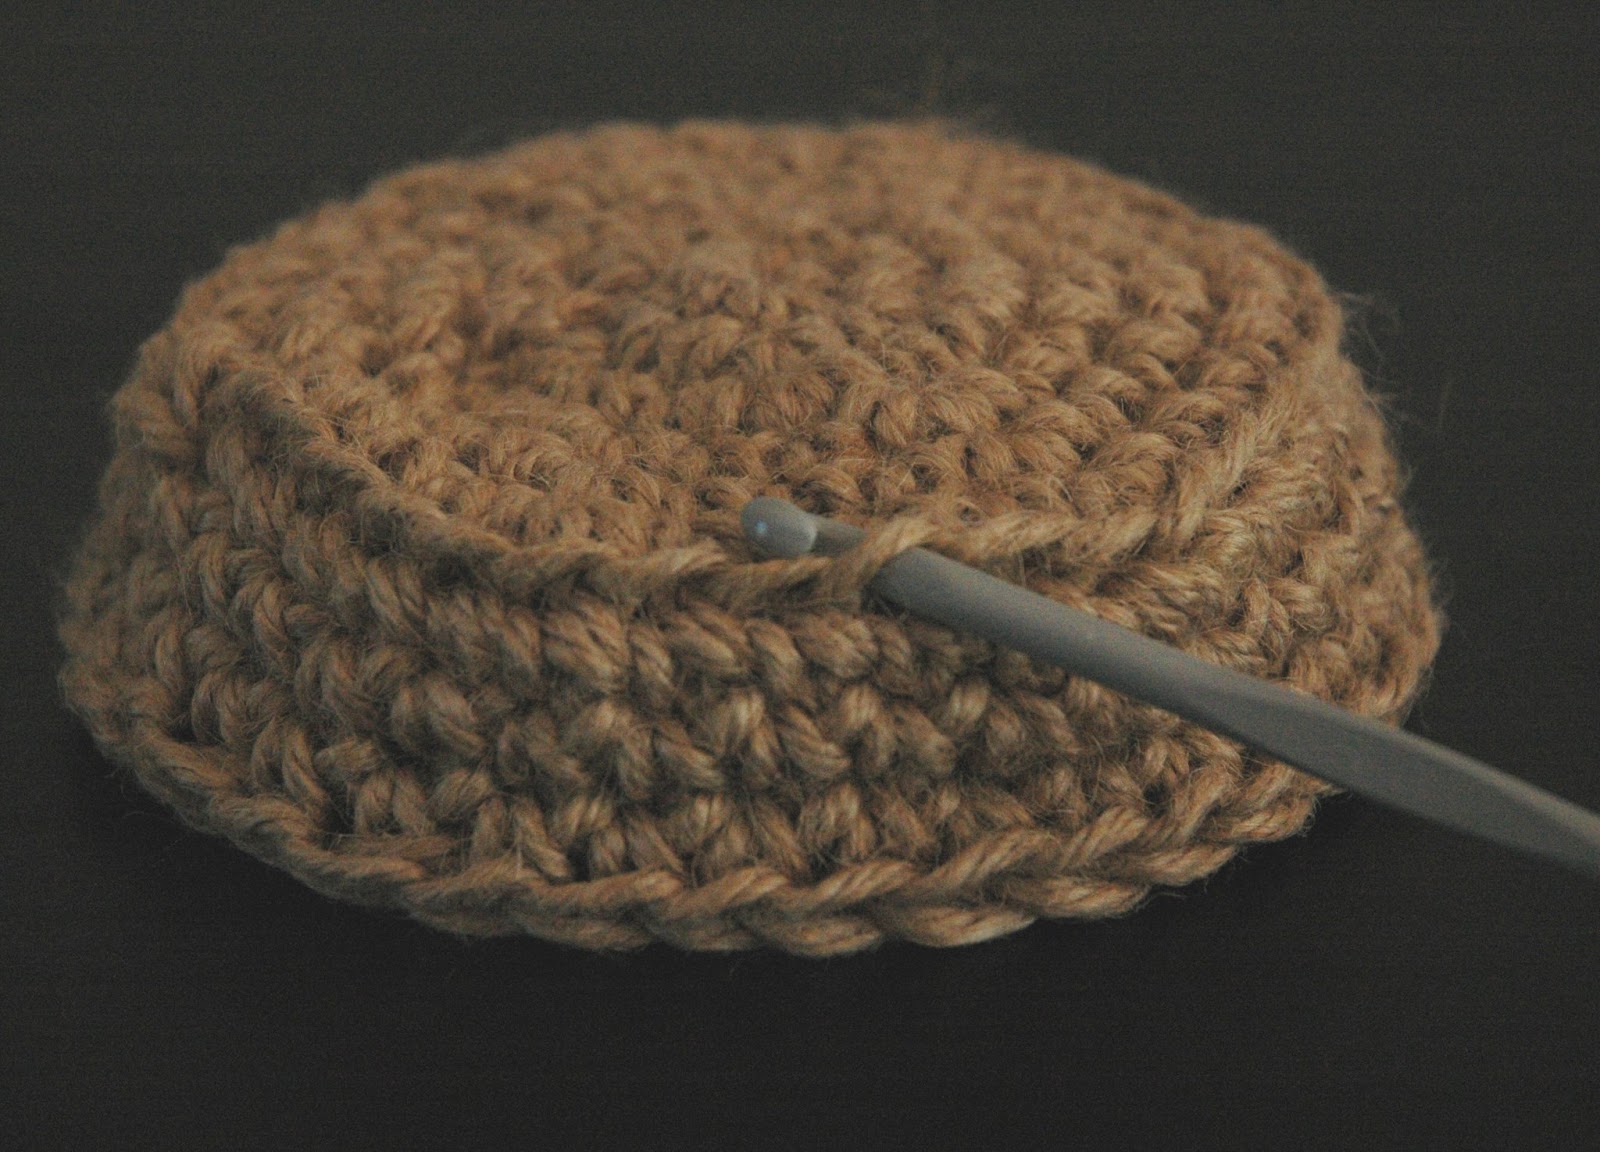
I’m showing you the bottom of the basket so you can see the
BLO round. See the ridge? I’ll put my hook in one to show you more closely.
Here is the basket before the fabric edge

I made this quite low because I wanted to complete it
quickly to get this tutorial up! This can be as tall as you wish, just keep
going round and round...
Like the twine, crocheting with fabric is a bit fiddly, but
for the opposite reason – it is very loose and can twist to the wrong side easily.
But again, you get into a groove after the first few stitches and it all comes
together.

I thought I’d upcycle the scraps from my piped invisible
zipper cushion I posted about here. I cut the leftover bias binding into
roughly 1cm (1/2 inch) strips and tied the ends together to make a long length
of fabric.
To work it into the twine, treat it as you would a colour
change of normal yarn. Make a slip knot with the fabric on the hook
Then insert hook into any edge st

Yarn over, though in this case it’s fabric over, and pull
back through, leaving two fabric loops on the hook

Then fabric over, and pull through both loops on the hook.
First stitch complete!

One fabric dc in each stitch, then fasten off. I find that
with these fabric strips, sometimes fastening off and weaving in the ends can
be tricky because the fabric is wider than normal yarn, and hiding fabric in a
contrasting twine basket is next to impossible. Feel free to see what works –
and looks – best with the type of fabric you use. Here I simply tied knots with
the ends of the fabric, then snipped off the tails and left the ragged ends on
the inside of the basket edge to blend in with the ragged look of the stitches.

A fantastic book that offers lots of inspiration and
patterns using unusual materials is this

I love Erika Knight’s designs, textures and colours. Here’s
a peek inside, see what a wide range of ‘yarns’ she employs!

Let me know if you try a basket, and please send me photos.
Have a lovely sunny weekend!
Chrissie x
Thanks for this - really clear instructions AND photos! Will definitely let you know if/when i give it a go. Have a lovely weekend x Jane
ReplyDeleteWish a could crochet - another thing to add to the 'to learn' list. Looks great!!
ReplyDeletePut it at the top of the 'To Do' list, Alicia, because it is quick to learn and so fun! Once you've finished your craft space, I'll send you some links and inspiration. I would love to see what your creative mind creates! (And the letter organiser you just posted about could hold hooks, some yarn and a pattern quite snugly...) cx
DeleteThis is beautiful. Thank you for the instructions. I'm a new follower on GFC. :)
ReplyDeleteThank you Jennifer and welcome! I like the versatility of the baskets - fabric and colour choices are endless, and they make sweet little gift baskets, too! Cx
DeleteExcellent instructions and the photos are fine. I think I'll give crocheting with fabric a go. Have a good weekend.
ReplyDeleteJ xx
Thank you! My mind is racing a bit with ideas for fabric crochet, but I have to sew a bit more to get more scraps! :) I look forward to seeing your creations, cx
DeleteI love your little basket and I really really want to make one now! We have a large ball of twine in the kitchen cupboard, perfect for this. Thank you very much for sharing your lovely clear tutorial with us all.
ReplyDeleteM x
I'm so glad you like it! A few lined up on a kitchen counter would be so sweet - you could make one to fit round a jar or tin as well...cx
DeleteI've often thought of making a basket with some sort of twine but had never thought of using fabric - it looks lovely, I'll have to have a go at making one, thanks for the tutorial!
ReplyDeleteAngie x